When developing 3D projects in Unity's Universal Render Pipeline (URP), the URP Decal Projector component is incredibly useful for adding details like wall graffiti, floor puddles, bullet holes, or simple character blob shadows. However, when placing decals in a scene, developers frequently face frustrating visual issues: decals stretching and distorting on slopes, projecting through to the back of walls, bleeding onto dynamic characters walking nearby, or not rendering in the scene at all.
These issues typically stem from improper sizing of the projector's local bounding box or a mismatch in URP's decal rendering paths (DBuffer vs. Screen Space). In this article, we'll explain the root causes of these decal artifacts and provide a step-by-step workflow to configure and adjust Decal Projectors for clean, localized results.
1. Root Cause ①: Projection Angle and the "Angle Fade" Threshold
A Decal Projector projects a texture along its local Z-axis (direction of the arrow). As the angle between the projection direction and the receiving surface's normal vector approaches 90 degrees (a steep slope or cliff), the projected pixels stretch excessively, causing ugly vertical distortions.
For example, if you place a projector pointing straight down to paint a puddle on the floor, any vertical walls within the projector's box will receive a highly stretched, messy streak of pixels along their sides. This is known as angle distortion or decal bleeding.
2. Root Cause ②: Excessively Deep Z-Size (Depth)
The Decal Projector's Size parameter consists of Width (X), Height (Y), and Depth (Z). The Z-size defines the distance the projection ray travels.
If the Z-size is set too deep, the decal will project straight through the target wall onto surfaces behind it, or onto characters passing behind or in front of the wall. Additionally, if the projector's bounding box extends too far forward from the wall, any player character walking close to the wall will catch the decal projection on their body, making it look like the texture is stuck to them.
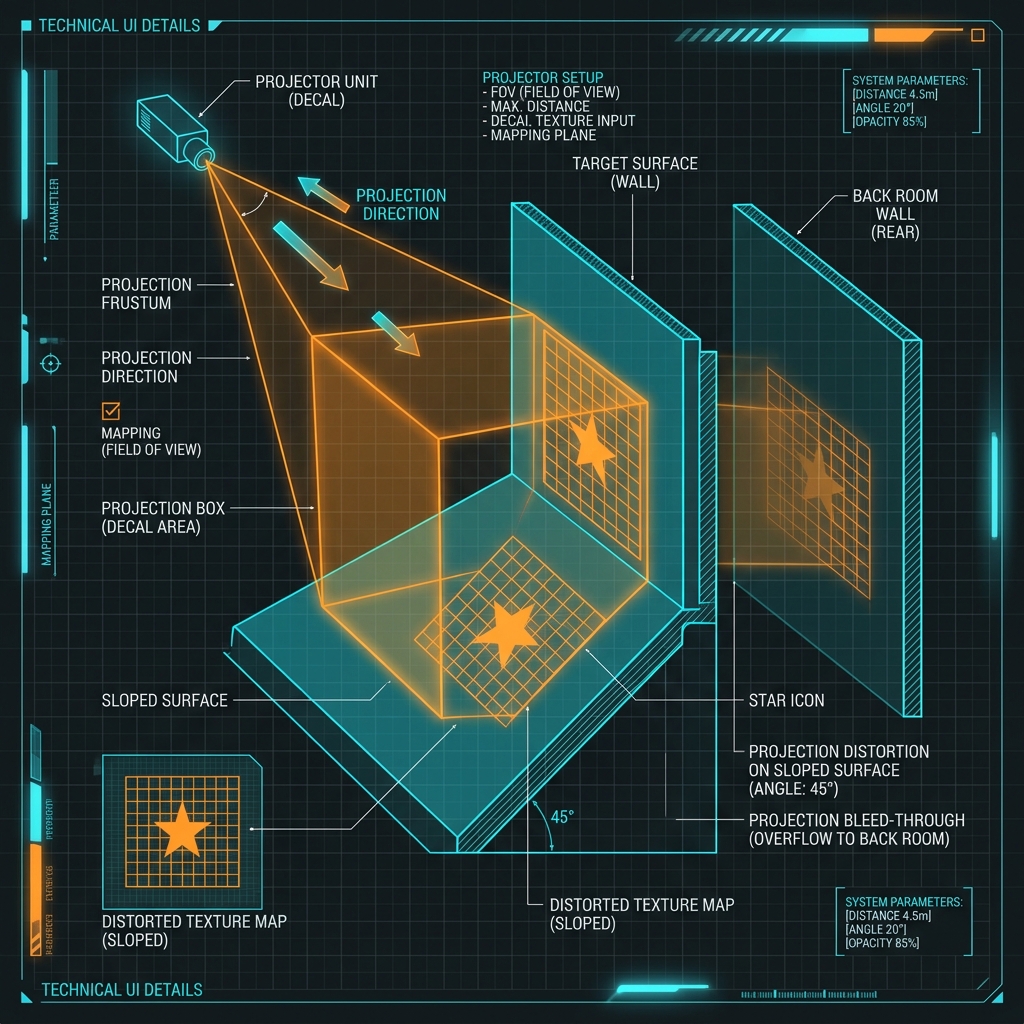
Diagram: Decal bleeding caused by deep Z-size settings vs. distortion prevention using angle fade limits.
3. Root Cause ③: Why Decals Fail to Render
If decals are completely invisible in your Game or Scene view, it is usually caused by one of two factors:
- Missing Renderer Feature:
The "Decal" Renderer Feature has not been added to your active URP Forward Renderer, meaning the pipeline skips decal draw calls entirely. - Disabled "Receive Decals" Option:
The material applied to the receiving mesh (e.g., the floor or wall) has "Receive Decals" disabled, masking out all decals on that surface.
4. Step-by-Step Guide to Fix Decal Stretching and Bleeding
Follow these steps to optimize your projector bounds and configurations for clean, localized decals:
Step 1: Minimize the Projector's Z-Size (Depth)
The most effective way to prevent bleeding is to reduce the projector's Z-size to the absolute minimum required to wrap the target surface.
- Select your
Decal ProjectorGameObject. - In the Inspector, decrease the
Size.zproperty (or adjust the depth box handles in the Scene view) from defaults like1.0or2.0down to0.1or0.05. - Position the projector very close to the surface, centering the shallow bounding box so it barely intersects the wall or floor.
This prevents the projection from reaching back walls or dynamic characters passing in front, instantly fixing bleeding issues.
Step 2: Cull Stretched Pixels Using "Angle Fade"
To automatically hide stretched decals on steep slopes, configure the Angle Fade parameters:
- Locate the Angle Fade settings on the
Decal Projectorcomponent. - Adjust the
StartandEndangle values (in degrees), for example, setting Start = 30 and End = 60. - This forces the decal to fade to transparent as the angle between the surface normal and the projection vector increases, eliminating jagged, stretched edges.
Step 3: Disable "Receive Decals" on Dynamic Characters
To prevent static environment decals from sticking to moving characters, disable decal reception on their materials:
- Select the material used by your character (e.g., Lit or Simple Lit).
- Expand the
Advanced Optionssection in the Inspector. - Uncheck the Receive Decals box.
This ensures the character is ignored by all Decal Projectors, preventing them from catching painted decals as they move through the environment.
5. Decal Rendering Paths: DBuffer vs. Screen Space
URP supports two main rendering pathways for decals. Choose the one that fits your project's performance budget and target platforms:
| Render Path | How it Works | Pros & Cons |
|---|---|---|
| 1. DBuffer (Decal Buffer) | Renders decals into a temporary buffer containing color, normal, and smoothness, blending them before lighting is evaluated. | Pros: Decals blend realistically with scene lighting, shadows, specularity, and normal maps. Cons: Requires additional VRAM. Can cause performance bottlenecks on mobile and VR hardware. |
| 2. Screen Space | Samples the camera's depth texture and reconstructs world space positions, overlaying decals directly onto the camera color target. | Pros: Extremely lightweight. Highly compatible with mobile and VR devices. Cons: Cannot blend smoothly with normal maps or specular reflections. May glitch on transparent surfaces. |
6. Enabling Decal Reception in Custom Shader Graphs
If you are using a custom shader created via Shader Graph, decals might not project onto it by default. To enable decal support:
- Open your custom Shader Graph.
- Select the Graph Settings tab (gear icon on the right).
- Under the Material settings, check the Receive Decals box.
- When compiled, the shader will automatically parse DBuffer data and blend it with your custom lighting outputs.
*Conversely, if you want to optimize performance for a custom Shader Graph that doesn't need decals, keep this setting unchecked to bypass decal sampling passes entirely.